Guide to RSS feeds
Repurposing website content can be the best time-saving hack an email marketer can choose to make. If you have access to a blog, leveraging an RSS feed to populate email content is a great way to save time while still building relationships with your subscribers.
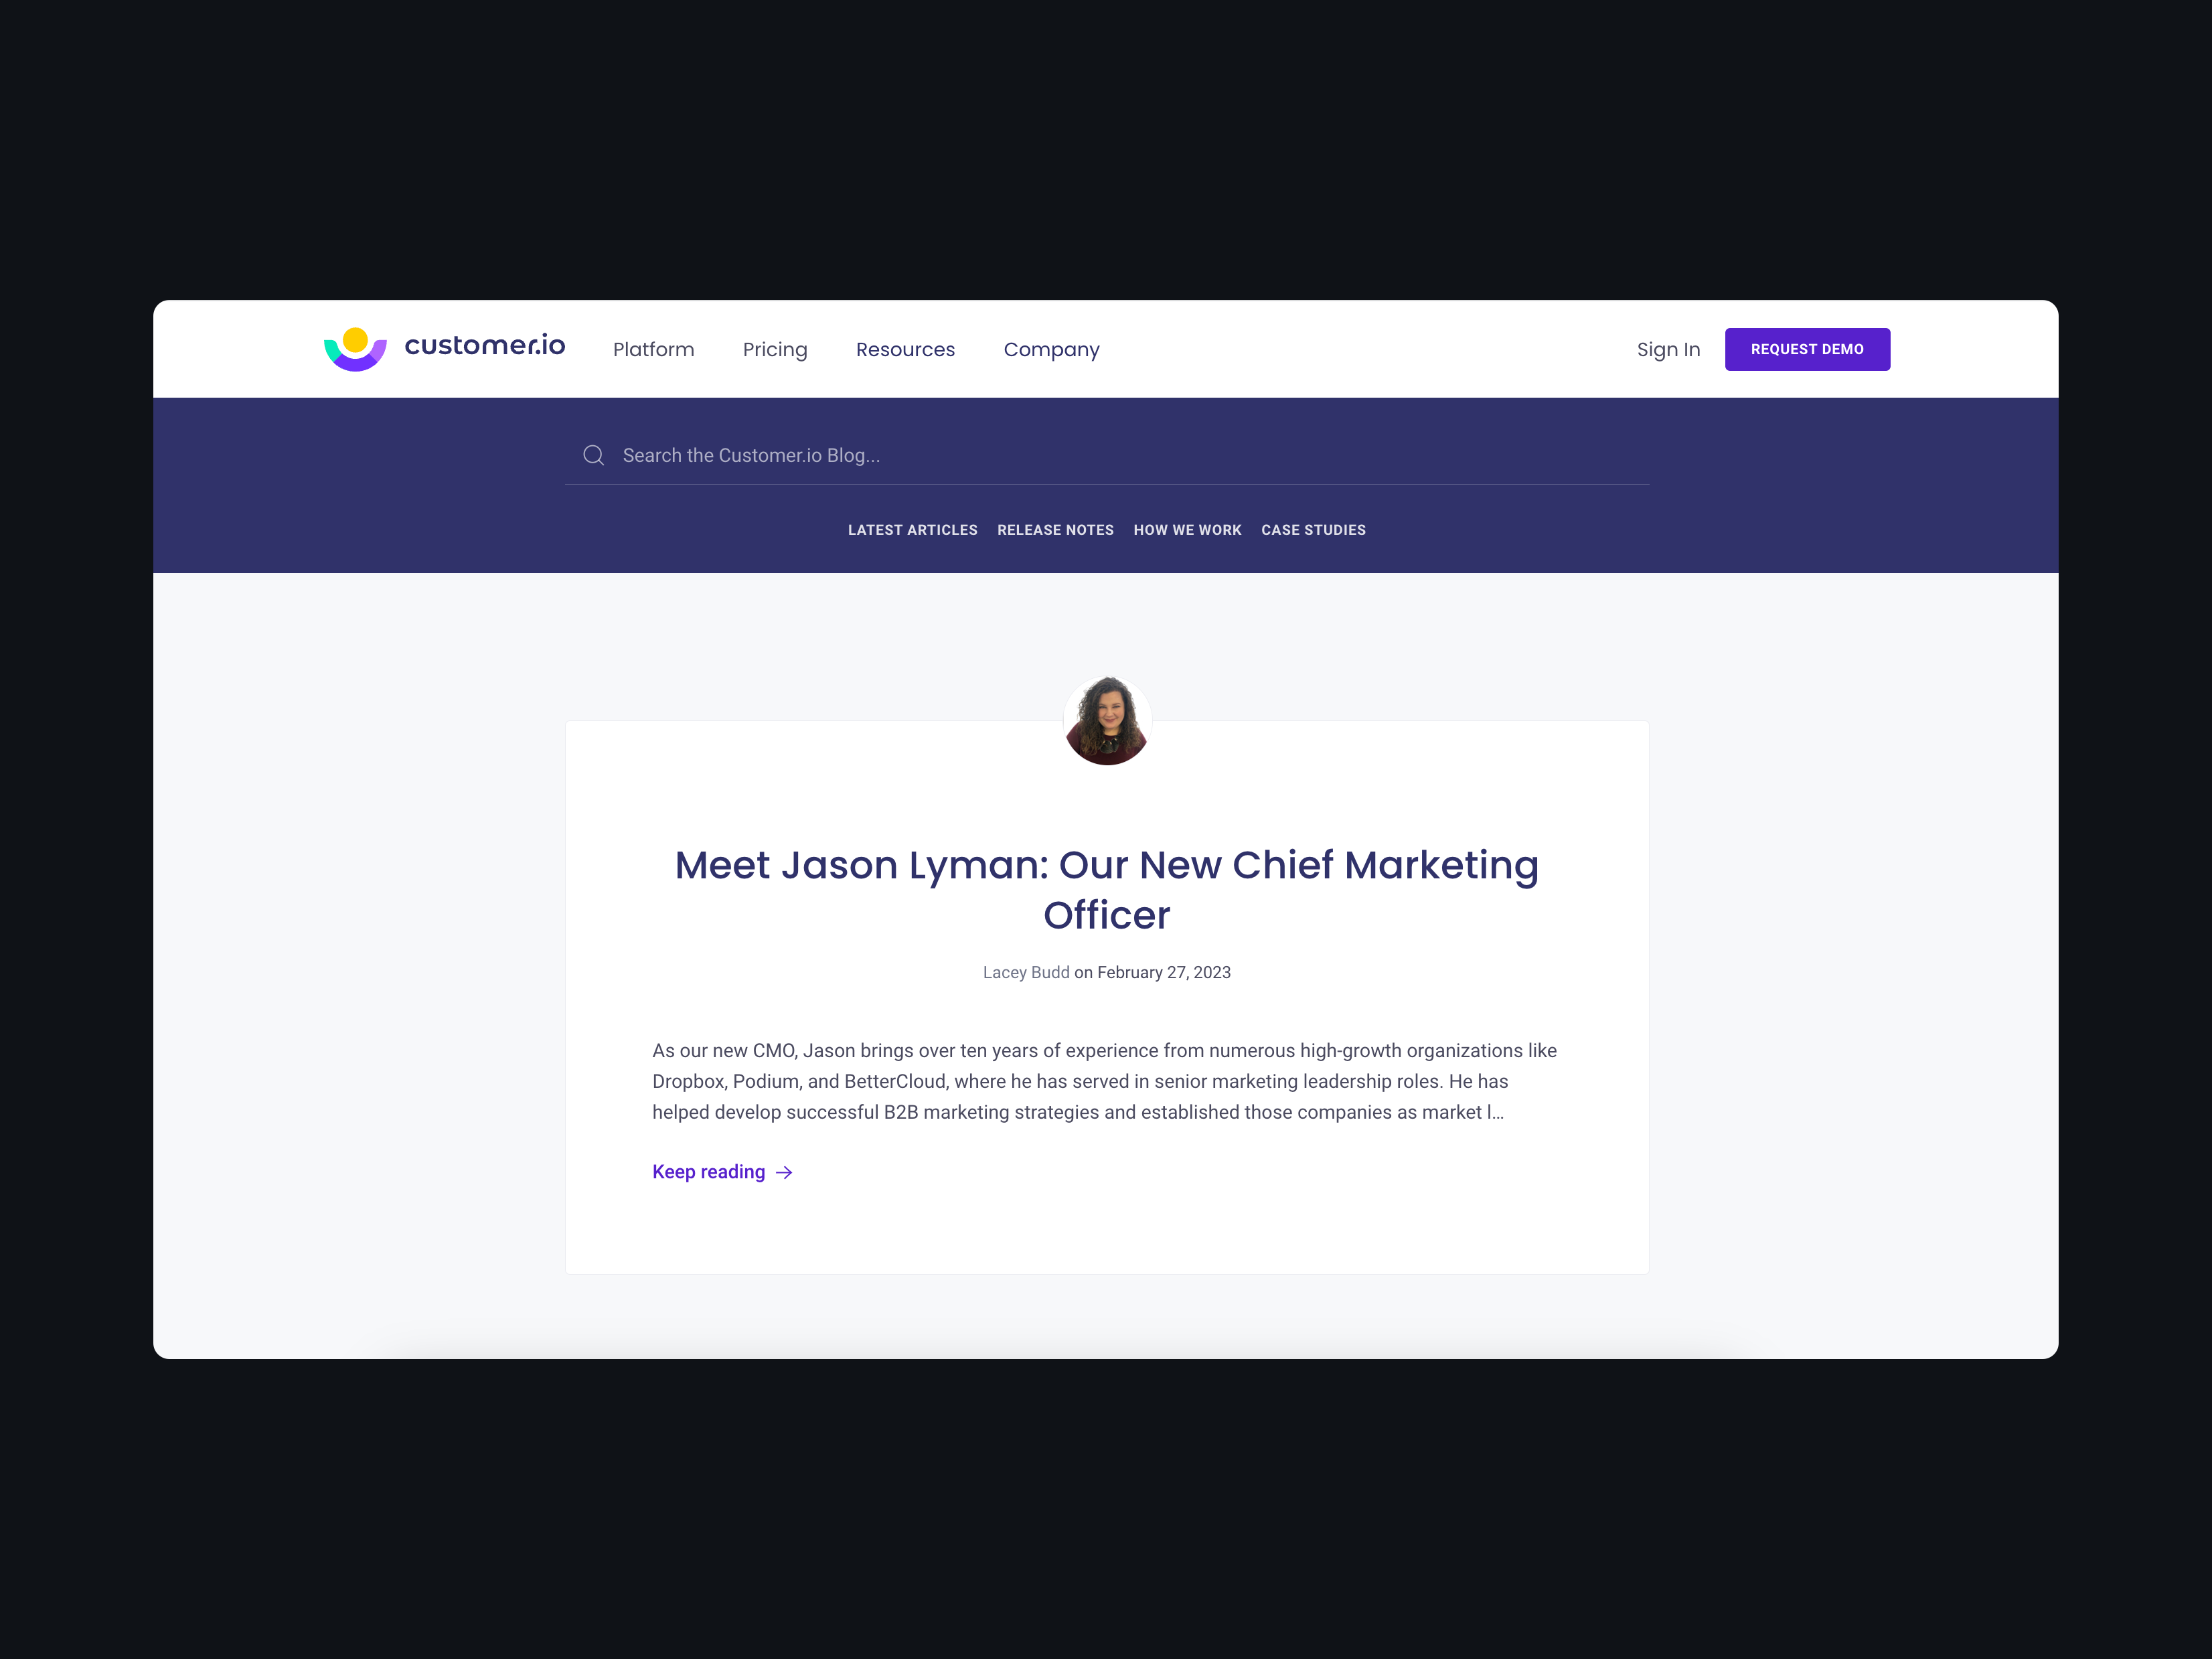
In this guide, we’ll show you how to populate an email with content from an RSS feed that can be used for various use cases. To illustrate how easy it is, we’ll bring in 2 of the latest blog articles from Customer.io to create a weekly newsletter (of sorts). Every week, this email will pull in the latest two blog posts from the RSS feed without any extra work needed from the marketer (aside from scheduling the email).
Let’s create an email that automatically fetches data from a blog feed! Here’s what it will look like:
Let’s start with a basic email template we want to work with.
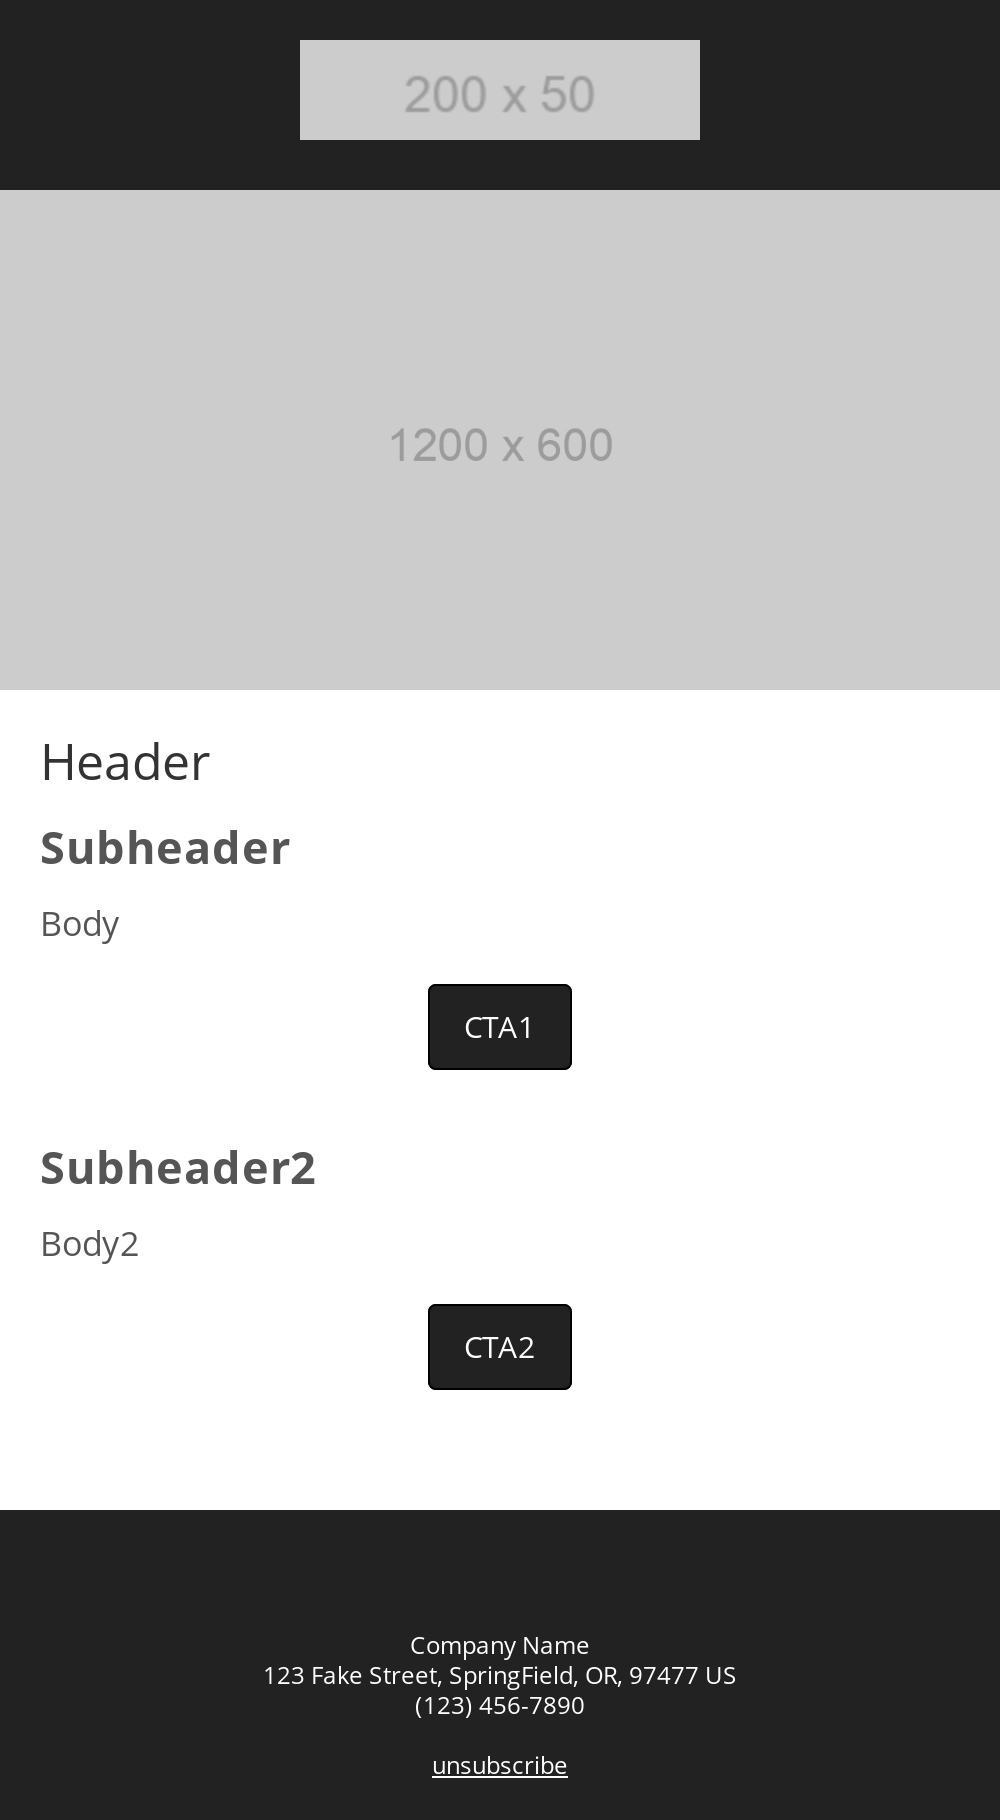
We have an email template with key pieces in the above example—a logo, hero image, header, Subheader, Body, CTA1, Subheader2, Body2, and CTA2.
I’d like to bring in the title of the blog(s) into the Subheader 1, and Subjeader 2, blog description into Body and Body 2, and a call to action to Continue Reading for both CTA1 and CTA2 using the correct hrefs of the blog.
- Parcel account
- URL of your RSS feed
- A component to fetch the RSS feed
- A component to identify individual RSS items
- A component to fetch the URL of the blog post for the CTA
- Email template you want to pull your content into
If you want to follow along as we build this out, you can open up these two resources to work off of.
There are a few ways to locate an RSS feed:
- Look for the orange RSS icon on the website or blog. It may be in the page's header, footer, or sidebar.
- You can also try adding "/feed" or "/rss" to the end of the website's URL.
- View Page Source, and then search for RSS.
You’ll first want to create a component that will eventually wrap around your entire email template to fetch the RSS feed into your email itself.
Let’s call this component <get-rss> since it will be used to call on the sheet we’re using.
Here’s what your component will look like in its end state.
<meta name="label" content="get-rss" />
<fieldset>
  <input type="text" name="url">
</fieldset>
<component>
  <fetch name="rss" set:url="url">
    <context name="rss" value="rss.rss.channel.item">
      <slot/>
    </context>
  </fetch>
</component>
Let’s break up the pieces of this component and explain why we’re using them.
<fieldset>is used to group controls. In our case, we’re using it to nest inputs that we can control in the email template.<input>is used to define an attribute we want to be able to customize from inside the email. We have one input we want to control from within the email template, and in this example it’s the blog URL.<context>We’ll reference the name of this context, in our second component. Additionally, the value corresponds to data we want to include. rss.rss.channel.item refers to the nested tags within each. Finally arriving at item, which contains all the data we want to include in our email! If you want to see how we came to this, take a look at the raw data from the RSS feed:
<?xml version="1.0" encoding="UTF-8"?>
<rss version="2.0"
	xmlns:content="http://purl.org/rss/1.0/modules/content/"
	xmlns:wfw="http://wellformedweb.org/CommentAPI/"
	xmlns:dc="http://purl.org/dc/elements/1.1/"
	xmlns:atom="http://www.w3.org/2005/Atom"
	xmlns:sy="http://purl.org/rss/1.0/modules/syndication/"
	xmlns:slash="http://purl.org/rss/1.0/modules/slash/"
	>

<channel>
	<title>Customer.io</title>
	<atom:link href="https://customer.io/feed/" rel="self" type="application/rss+xml" />
	<link>https://customer.io/</link>
	<description>Marketing Automation for the Whole Customer Lifecycle</description>
	<lastBuildDate>Mon, 27 Feb 2023 17:30:05 +0000</lastBuildDate>
	<language>en-US</language>
	<sy:updatePeriod>
	hourly	</sy:updatePeriod>
	<sy:updateFrequency>
	1	</sy:updateFrequency>
	<generator>https://wordpress.org/?v=6.1.1</generator>
	<item>
		<title>Meet Jason Lyman: Our New Chief Marketing Officer</title>
		<link>https://customer.io/blog/meet-jason-lyman-our-new-chief-marketing-officer/</link>

		<dc:creator><![CDATA[Lacey Budd]]></dc:creator>
		<pubDate>Mon, 27 Feb 2023 17:07:16 +0000</pubDate>
				<category><![CDATA[Blog]]></category>
		<category><![CDATA[Company News]]></category>
		<guid isPermaLink="false">https://customer.io/?p=31893</guid>

					<description><![CDATA[<p>As our new CMO, Jason brings over ten years of experience from numerous high-growth organizations like Dropbox, Podium, and BetterCloud, where he has served in senior marketing leadership roles. He has helped develop successful B2B marketing strategies and established those companies as market leaders. Jason brings experience in supporting both self-serve and enterprise sales motions, which will be critical for Customer.io to reach a broader market this year.</p>
<p>The post <a rel="nofollow" href="https://customer.io/blog/meet-jason-lyman-our-new-chief-marketing-officer/">Meet Jason Lyman: Our New Chief Marketing Officer</a> appeared first on <a rel="nofollow" href="https://customer.io">Customer.io</a>.</p>
]]></description><fetch>This is where we define the action of fetching data from our URL. We also set a name for our data source here, which in our case, we’re calling it “rss”. We’ll use this when we reference this data. Currently, fetch can only be used for data up to 16kb; anything larger may cause issues.<slot/>This is where all the content inside our component will go. For this use case, we’re wrapping our entire email template with this component, so the<slot/>leaves room for the whole email.
The second component you’ll use involves a bit of JavaScript to work. Let’s call this component <get-rss-item>.
<meta name="label" content="get-rss-item" />
<fieldset>
  <input type="number" name="index">
  <input type="text" name="key">

</fieldset>
<component>
  ${context.rss[index-1][key]}
</component><fieldset>you’ll see fieldset is being used again, to nest another input (or two).<Input name=”index”>- this input will allow you to reference individual “blog posts.”<Input name=”key”>- This input will allow you to jump into your email template and match the “key,” which refers to the column containing the different email variables (subject line, body, CTA2, etc.) up with its corresponding spot in the email template itself!
<component>- inside of this tag, you’ll want to include Javascript to reference the first component we just created (context.rss).
Our third component will fetch the URL of the blog post, to add as the CTA’s href. Because you can’t put an HTML tag inside of an HTML attribute, we need to use this third component to fetch the variable.
We’ll call this component <get-rss-value>.
<meta name="label" content="get-rss-value" />
<fieldset>
  <input type="number" name="index">
  <input type="text" name="key">

</fieldset>
<component>
 <context name="value" value="context.rss[index-1][key]">
   <slot></slot>
 </context>
</component>
We’ve added a <slot> tag into this component, because it will wrap the entire <a> tag of our CTA.
There are most likely multiple keys you can bring in from your RSS feed into your email. Think of these as the sub-sections or variables of your blog post. You will likely have a title, author, publish date, description, or other pieces of metadata you want to include. Let’s examine our own data source to understand what we have available!
You can examine the data by navigating to the URL of your RSS feed. In our case, it’s https://customer.io/feed/.
<title>Meet Jason Lyman: Our New Chief Marketing Officer</title>
		<link>https://customer.io/blog/meet-jason-lyman-our-new-chief-marketing-officer/</link>

		<dc:creator><![CDATA[Lacey Budd]]></dc:creator>
		<pubDate>Mon, 27 Feb 2023 17:07:16 +0000</pubDate>
				<category><![CDATA[Blog]]></category>
		<category><![CDATA[Company News]]></category>
		<guid isPermaLink="false">https://customer.io/?p=31893</guid>

					<description><![CDATA[<p>As our new CMO, Jason brings over ten years of experience from numerous high-growth organizations like Dropbox, Podium, and BetterCloud, where he has served in senior marketing leadership roles. He has helped develop successful B2B marketing strategies and established those companies as market leaders. Jason brings experience in supporting both self-serve and enterprise sales motions, which will be critical for Customer.io to reach a broader market this year.</p>
<p>The post <a rel="nofollow" href="https://customer.io/blog/meet-jason-lyman-our-new-chief-marketing-officer/">Meet Jason Lyman: Our New Chief Marketing Officer</a> appeared first on <a rel="nofollow" href="https://customer.io">Customer.io</a>.</p>
]]></description>
The above represents one blog post (ie. an item). For our example, we want the <title>, <description>, and <link> to be included in our email template.
If you want to instead reference this data inside of Parcel instead of in a different tab, you can add this code to the top of your email before your opening HTML tag.
<pre>${JSON.stringify(context.rss[0], null, 2)}</pre>Begin by adding your entire <get-rss> component around the email template you’re working out of.
Where you currently have placeholder text, replace it with your second component, which will be self closing — customizing the two inputs. Starting with replacing our Subheading, we want to pull in the title of the blog article here. So our index is 1, because it is the first blog article on the RSS feed, and the key is title.
<get-rss-item index="1" key="title" />
The next item we’ll replace is the Body placeholder so that we can pull in the blog description.
<get-rss-item index="1" key="description" />
Maintaining the same structure as before, all we’re updating now is the key name from title, to description.
The third piece of content we will be updating is the CTA1. We’ll be pulling in the href, and replacing the button copy with our own, instead of calling on the blog feed’s call-to-action copy.
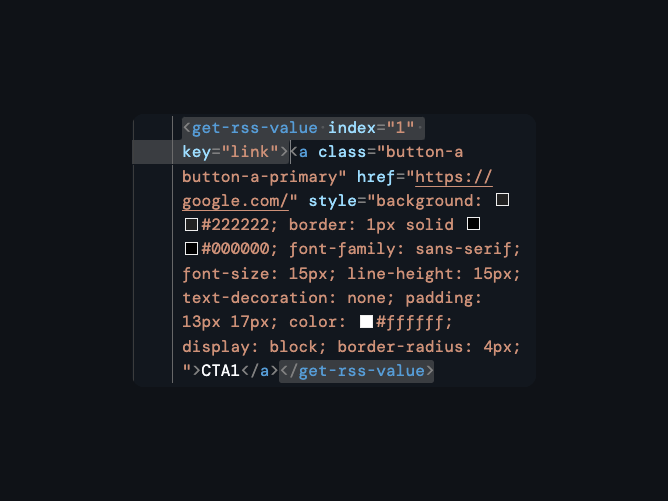
Inside of the opening component tag, as with the previous components we’ve used, we want to set values for the inputs we’ve defined. We’re calling on the first blog post, so index=1, and this time we’ll be calling on the <link>.
Let’s now update the href.
set:href="context.value"Remember how in the component, we had a context line? This is where it comes out to play! By wrapping the ref in a set, and then calling on context.value, you’re successfully pulling in the link from the RSS feed.
When you want to continue pulling in the second blog post, you can repeat the steps above but instead of calling on index=1, you’ll update this to be index=2, so that you are referring to the second blog post in the RSS feed.
Et voila! Once the RSS feed is updated with new posts, you’ll see content start to shift and self-update automatically.
Here’s the completed working file if you have been working alongside and would like to cross-reference.
Other opportunities
Pulling from an RSS feed can be a quick way to grab existing content. It doesn’t have to take up the entire email; the latest blog posts could live as a small 3-column module at the bottom.
Furthermore, you could call on different RSS feeds to bring in various resources!