Guide to fetching data
Edit: this guide is specific to those leaning on legacy components.
Have you ever wanted to fetch data, such as copy or imagery, into an email template from an external source? It seems like it would often save quite a bit of time, as copywriting happens typically in a different location than coding with HTML & CSS.
It's fairly simple to set up an email template to fetch copy from a Google Sheet directly into your email without any manual copy and pasting. Although this specific example will be focused on Google Sheets, there are several other ways it can also be done!
In this guide, let's localize an email by calling on the different copy hosted in a Google Sheet. Your email template can call on different data in a few simple actions, making localizing and implementing new copy a simple task!
Let’s start with a basic email template we want the copy to populate into.
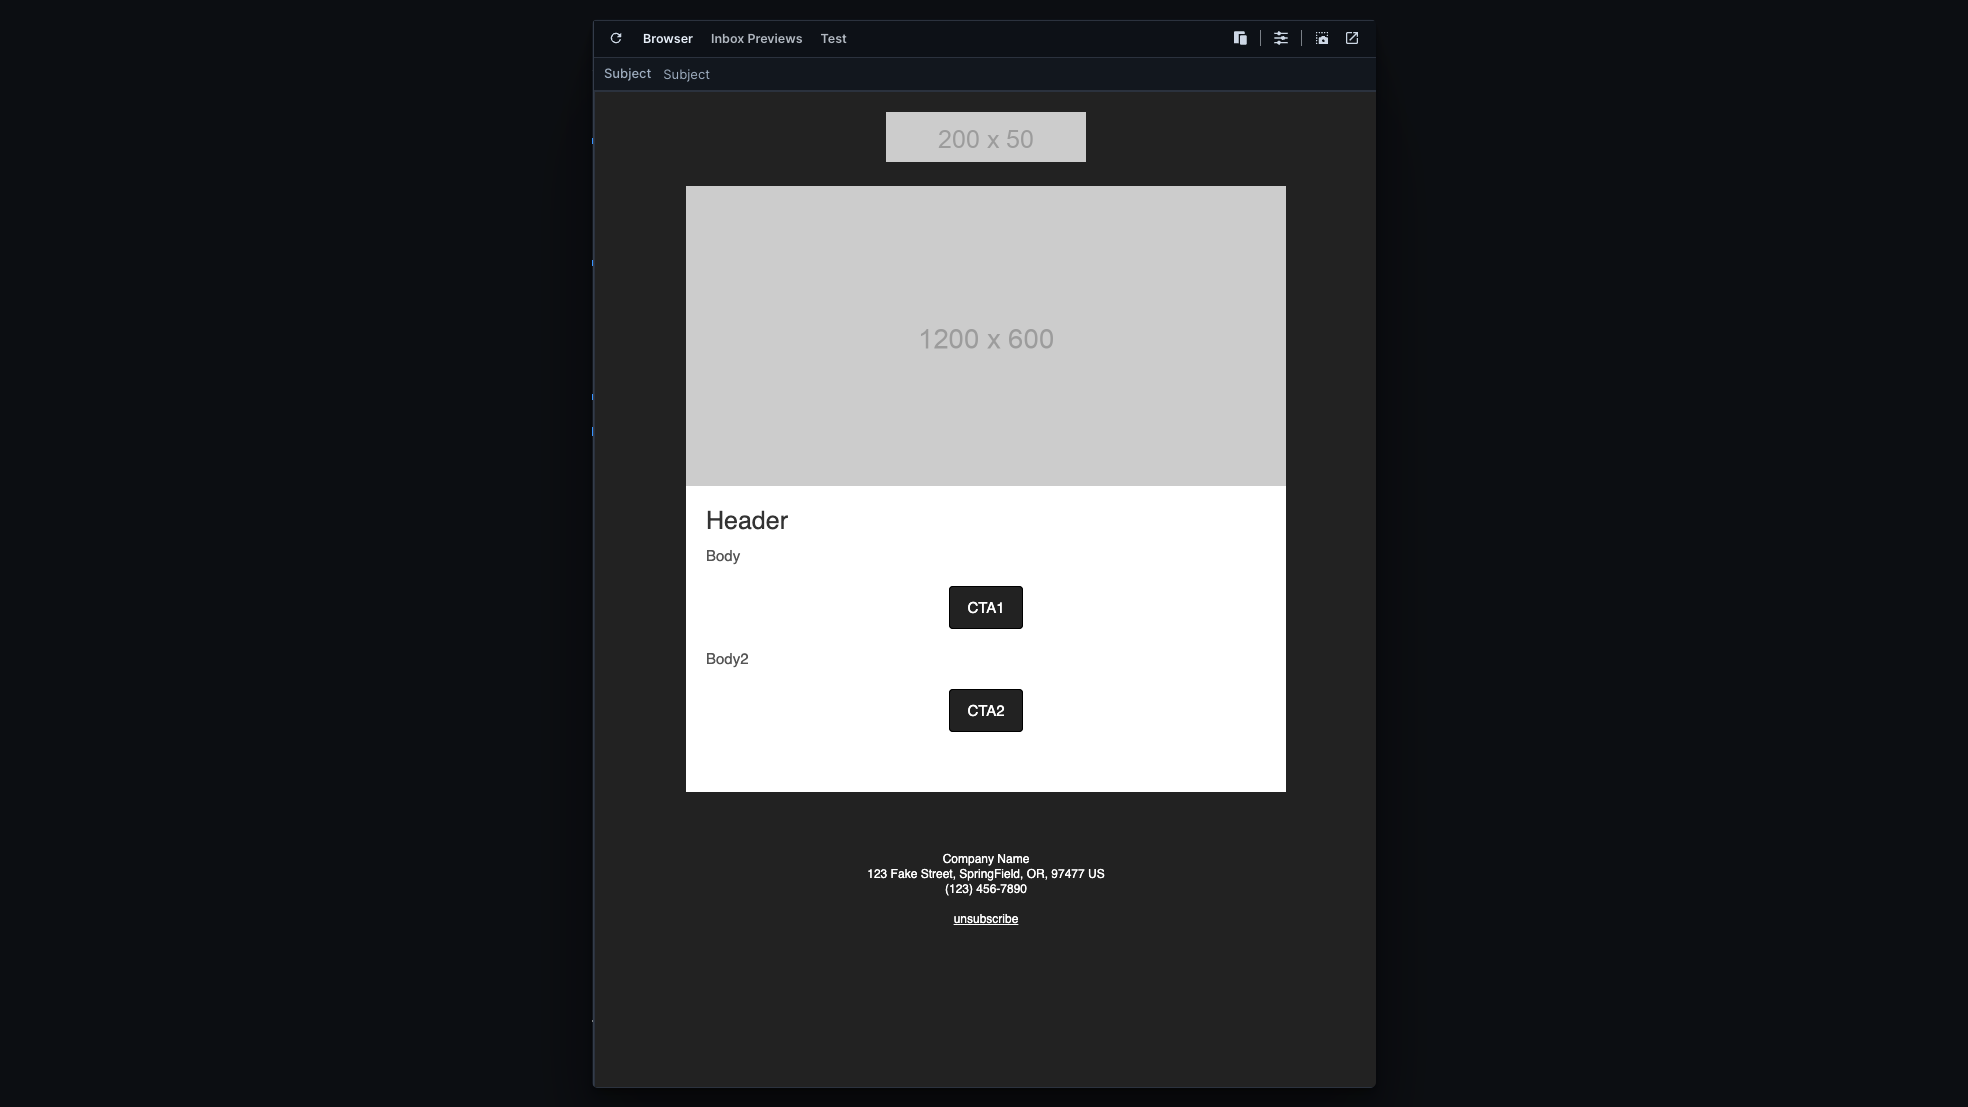
We have an email template with key pieces in the above example—a logo, hero image, header, body, CTA1, Body2, and CTA2. In this guide, we'll focus on fetching the copy.
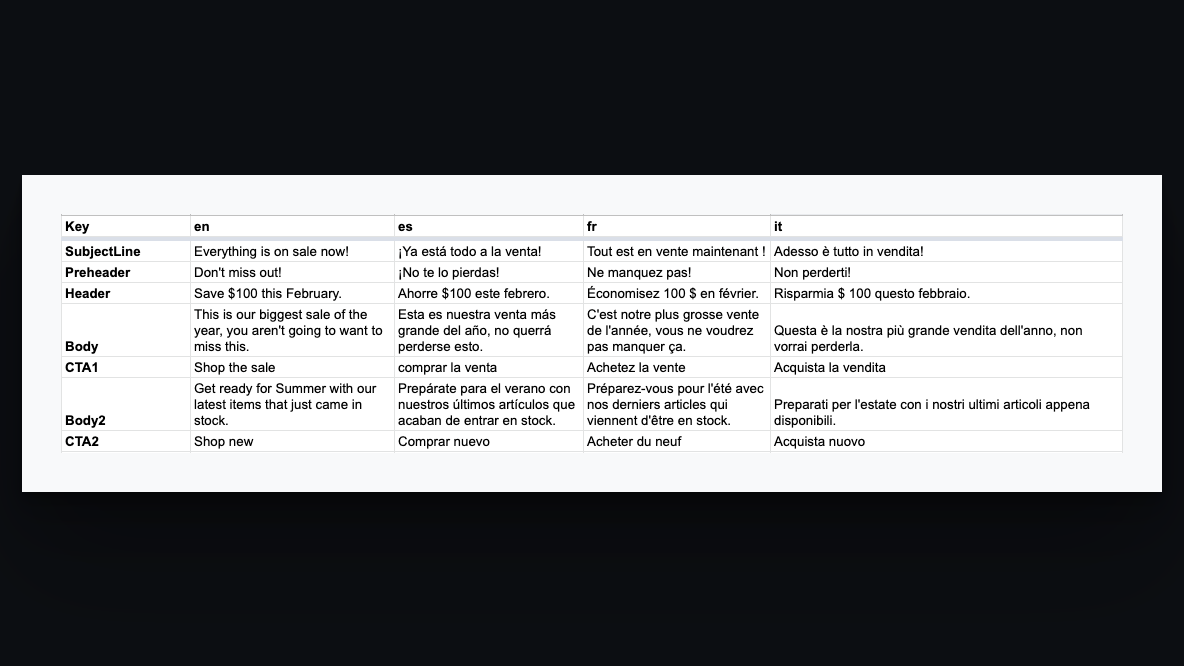
We want to take copy hosted in a spreadsheet and call it into the email based on the corresponding key name and language.
- Parcel account
- URL of your data source. Ensure your permissions are set so the data source is not gated via a password.
- 1 component to fetch your sheet URL
- 1 component to fetch the individual cells from the sheet itself
- Email file you want the data to be pulled into
If you want to follow along as we build this out, you can open up these two resources to work off of.
You’ll first want to create a component that will eventually wrap around your entire email template to fetch content from your data source.
Let’s call this component <get-sheet> since it will be used to call on the sheet we’re using.
Here’s what your component will look like in its end state.
<meta name="label" content="get-sheet" />
<fieldset>
  <input type="number" name="key-column" value="1">
  <input type="number" name="text-column">
  <input type="text" name="url">
</fieldset>
<component>
  <context name="keyColumn" value="keyColumn">
  <context name="textColumn" value="textColumn">
  <fetch name="sheet" set:url="url">
    <context name="sheet" value="sheet">
      <slot/>
    </context>
  </fetch>
</context>
</context>
</component>
Let’s break up the pieces of this component and explain why we’re using them.
<fieldset>is used to group controls. In our case, we’re using it to nest inputs which we can control in the email template itself.<input>is used to define an attribute we want to be able to customize from inside the email. We’ll show how we plan to use these inputs when we add this component to our email in a few steps. We have three inputs nested inside of the<fieldset>for these purposes:- Call on the key column to select the language (English, Spanish, French, or Italian).
- Call on the text column to pull in the header, body, or CTA text. This input will be used in our second component we are about to create,
- Call on the URL
<fetch>This is where we define the action of fetching data from our URL. We also set a name for our data source here, which in our case we’re calling it “sheet”. We’ll use this when we reference this data. Currently, fetch can only be used for data up to 16kb, anything larger may cause issues.<slot/>This is where all the content inside our component will go. For this use case, we’ll wrapping our entire email template with this component, so the<slot/>leaves room for the whole email.
The second component you’ll use involves a bit of JavaScript. But no fear! Let’s again break down the aspects of it.
<meta name="label" content="get-content" />
<fieldset>
  <input type="text" name="key">
</fieldset>
<component>
  <fragment foreach="row in context.sheet">
    <fragment if="row[context.keyColumn-1] === key">
      ${row[context.textColumn-1]}
    </fragment>
  </fragment>
</component><fieldset>you’ll see fieldset is being used again, to nest another input. This input will allow you to jump into your email template and match the “key,” which refers to the column containing the different email variables (subject line, body, CTA2, etc.) up with its corresponding spot in the email template itself!<fragment>This is where we’ll pull in some clever logic without adding any code to the output.foreach="row in context.sheet"is going to loop through each row in our google sheet.if="row[context.keyColumn-1] === key"then in each row we’re going to look to see if the name in the key column of our spreadsheet matches the name of the key we are looking for .keyColumn-1computers like to start counting from0. So the first column would be0the second would be1etc. to make this a bit more human-friendly, you can reference the first column as1second column as2etc. then just-1of that to convert it into a computer-friendly reference.Adding components to my existing email template
Wrap your entire email in the first component we created called <get-sheet>. The opening tag of your component should also include the three inputs we defined. The first line of your email template should end up looking like:
<get-sheet key-column="2" text-column="3" url="https://docs.google.com/spreadsheets/d/1Wk4XImv1DQTJyarN1inIQynCXEM17I0NFAKOteIlXhI/gviz/tq?tqx=out:csv&sheet=Sheet1">Remember in the <get-sheet> component; we defined the key-column as a number data type? This is because we want to reference the column number in the sheet we’re pulling data from. Because we’ll be referencing key’s where we want email copy to pull into, we will be referring to the 2nd column where each key name is defined. So the key-column input, in this case, will be 2. The text-column input will correspond to the language the email will be translated into. Again, this is a number field because it is referring to the column number. In this example, we’re calling on the “en” or English copy, which sits in Column 3 of our sheet. Here are the numbers we have to play with and their corresponding selection.
- Column 2 = key
- Column 3 = English copy
- Column 4 = Spanish copy
- Column 5 = French copy
- Column 6 = Italian copy
Thirdly, the URL input is where you will reference the data source. Again, remember that sharing permissions should be open!
Let’s now use our second component to replace our placeholder copy in our email template and get this show on the road!
We only defined one input in our <insert-text> component. You can begin to make your way through your email template and replace all placeholder copy with <insert-text label=”your key name”/>. This self-closing tag is all you need to start dynamically pulling in copy from your data source.
In this example, our “Header” placeholder became <insert-text key="Header"/>.
We can continue to replace the remaining placeholder copy with the component and specify the corresponding key.
Once you’ve successfully converted all placeholder text into the component with the specified input the copy corresponds to, you should have an email that renders in English!
When you’re ready to change the corresponding language, all you’ll need to do is change the number referenced in the text-column input, to the number of the column you want your email to render in.
If you’ve been following along, and have been scratching your head thus far, here’s the final working email template with both components we created in this guide integrated.
Calling on an external data source isn’t exclusive to a localization use case!
Some others areas where you could pull in information from an external data source could include pulling in a list of products rather than adding them one at a time, pulling in personalize content, pulling in your latest blog, Twitter, or Instagram posts. We’re excited to see what you create!